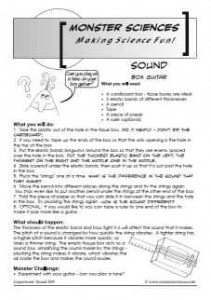
Make your own guitar with elastic bands and a tissue box. Then use it to discover how the speed of the vibration changes the pitch of the sound.
 |
 |
Sound Science Experiment: Box Guitar
What you will need:
• A cardboard box – tissue boxes are ideal
• 3 elastic bands of different thicknesses
• A pencil
• Tape
• A piece of paper
• A ruler (optional)
What you will do:
1. Take the plastic out of the hole in the tissue box. Do it neatly – don’t rip the cardboard!
2. If you need to, tape up the ends of the box so that the only opening is the hole in the top of the box.
3. Put the elastic bands longways around the box so that they are evenly spaced over the hole in the box. Put the thickest elastic band on the left, the thinnest on the right and the middle one in the middle.
4. Slide a pencil under the elastic bands, then push it up so that it is just past the hole in the box.
5. Pluck the “strings” one at a time. What is the difference in the sound that they make?
6. Move the pencil into different places along the strings and try the strings again. You may even like to put another pencil under the strings at the other end of the box.
7. Fold the piece of paper so that you can slide it in between the strings and the hole in the box. Try plucking the strings again. How is the sound different?
8. OPTIONAL: If you would like to you can tape a ruler to one end of the box to make it look more like a guitar.
What should happen:
The thickness of the elastic band and how tight it is will affect the sound that it makes. The pitch of a sound is changed by how quickly the string vibrates. A tighter string has a higher pitch because it vibrates more quickly, so does a thinner string. The empty tissuse box acts as a sound box, amplifying the sound made by the strings – plucking the string makes it vibrate, which vibrates the air inside the box and makes the sound louder.
Monster Challenge:
• Experiment with your guitar – can you play a tune?
Teaching Notes: Monster Sciences Experiment: Sound S09
Key Concepts:
• How strings vibrate to make sound
• How sound can be amplified
Resources:
• Experiment description Sound S09 – one copy per student.
• tissue boxes, elastic bands of different thicknesses, pencils, tape, paper, cardboard cylinder (optional)
Lesson Notes:
Begin the lesson by reviewing what the students already know about how sounds are made. You may like to start by discussing thinks that make sounds, like different kinds of instruments and what they have in common and what is different. For example, drums make sound by vibrating the skin of the drum, woodwind instruments the sound comes from the vibrating reed and string instruments vibrate the string. Explain that the students are going to make and play with their very own version of a guitar and investigate how it creates sound.
Before beginning the experiment students should complete the sections of their Investigation Report IR01 from ”Title to “Hypothesis”.
At the end of the lesson gather the students together again and discuss their results.
What should happen in this experiment, and why?
Students should be able to describe how the sound is made – the strings (in this case the elastic bands) vibrate when they are plucked and in turn vibrates the air inside the box which amplifies the sound. They should also understand that the speed that the string vibrates affects the pitch of the sound – the more quickly it vibrates, the higher the pitch. Thick elastic bands tend to vibrate slower than thin ones, so they have a lower pitch. Loose elastic bands also vibrate more slowly than tight bands.
Follow up questions:
• What did you discover about the way sound changed when you plucked different elastic bands?
• How does a guitarist change the pitch of the sound on a real guitar (use different strings – thicker or thinner or shorten the string by holding it on the fret board).


