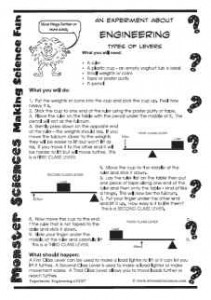
There are 3 different kinds of levers. In this engineering science experiment you can build them and learn how they work.
 |
 |
An Experiment about Engineering: Types of levers
What you will need:
• A ruler
• A plastic cup – an empty yoghurt tub is ideal
• Small weights or coins
• Tape or poster putty
• A pencil
What you will do:
1. Put the weights or coins into the cup and pick the cup up. Feel how heavy it is.
2. Stick the cup to one end of the ruler using the poster putty or tape.
3. Place the ruler on the table with the pencil under the middle of it. The pencil will act as the fulcrum.
4. Gently press down on the opposite end of the ruler – the weights should rise. If you move the fulcrum closer to the weights they will be easier to lift but won’t lift as far. If you move it to the other end it will be harder to lift but will move further. This is a FIRST CLASS LEVER.
5. Move the cup to the middle of the ruler and stick it down.
6. Lay the ruler flat on the table then put one piece of tape along one end of the ruler and then onto the table – kind of like a hinge. This will now be the fulcrum.
7. Put your finger under the other end and lift it up. How easy is it to life them? This is a SECOND CLASS LEVER.
8. Now move the cup to the end of the ruler that is not taped to the table and stick it down.
9. Slide your finger under the middle of the ruler and carefully lift it. This is a THIRD CLASS LEVER.
What should happen:
A First Class Lever can be used to make a load lighter to lift or it can let you lift it further. A Second Class Lever is used to make a load lighter or make movement easier. A Third Class Lever allows you to move loads further or reach further.
Teaching Notes: Monster Sciences Experiment: Engineering EG07
Key Concepts:
• Types of levers
Resources:
• Experiment description Engineering EG07 – one copy per student.
• Investigation record IR – one copy per student.
• Rulers, plastic cups, small weights or coins, tape or poster putty (eg Blu Tak), pencils
Lesson Notes:
As a class read through the proceedure of this experiment and discuss how the students are going to make 3 different types of levers. Remind them that they will be comparing them, so they need to pay attention to their observations as they go.
What should happen in this experiment and why?
Your students should be able to build and compare the 3 different types of levers. Some examples of each are:
First Class Levers:
hammer, see saw, pliers and scissors (both use 2 first class levers)
Second Class Levers:
stapler, bottle opener, spanner, wheelbarrow, doors, nail clippers and nut crackers (both use 2 second class levers), your jaw when you bite with your front teeth
Third Class Levers:
fishing rod, spoon, cricket bat, broom, tweezers and tongs (both use 2 third class levers), your jaw when you are chewing your food, your arms and legs (your elbows and knees are the fulcrum, your muscles provide effort to the bones which act as the lever to lift the load – your hand or foot.
Follow up question:
• How do levers help us in our day to day lives?


