Make a windmill and use it to harness the wind and learn about this renewable energy source.
 |
 |
Monster Sciences Energy Experiment: Make a windmill
What you will need:
• A square of paper about 20 cm (8 inches)
• A pencil with an eraser in the end
• A pin or thumbtack
• A ruler
• Scissors
What you will do:
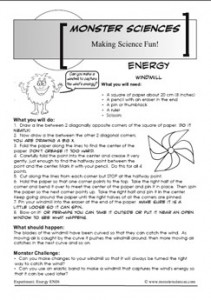
1. Draw a line between 2 diagonally opposite corners of the square of paper. Do it neatly!
2. Now draw a line between the other 2 diagonal corners. You are drawing a big X.
3. Fold the paper along the lines to find the center of the paper. Don’t crease it too hard.
4. Carefully fold the point into the center and crease it very gently, just enough to find the halfway point between the point and the center. Mark it with your pencil. Do this for all 4 points.
5. Cut along the lines from each corner but STOP at the halfway point.
6. Hold the paper so that one corner points to the top. Take the right half of the corner and bend it over to meet the center of the paper and pin it in place. Then spin
the paper so the next corner points up. Take the right half and pin it in the center. Keep going around the paper until the right halves of all the corners are pinned.
7. Pin your windmill into the eraser at the end of the paper. Make sure it is a little loose so it can spin.
8. Blow on it! Or perhaps you can take it outside or put it near an open window to see what happens.
What should happen:
The blades of the windmill have been curved so that they can catch the wind. As moving air is caught by the curve it pushes the windmill around, then more moving air
catches in the next curve and so on.
Monster Challenges:
• Can you make changes to your windmill so that it will always be turned the right way to catch the wind?
• Can you use an elastic band to make a windmill that captures the wind’s energy so that it can be used later?
TEACHING NOTES: Monster Sciences Experiment: Energy EN06
Key Concepts:
• How the wind’s energy can be captured
Resources:
• Experiment description Energy EN06 – one copy per student.
• squares of paper, scissors, pencils with erasers on the top, rulers, pins or thumbtacks
Lesson Notes:
Begin the lesson by reviewing what the students already know about renewable energy. Ask if any have seen the big windmills used to generate electricity. Ask them to explain where the energy has come from. Some may say electricity in the air, like lightning or static electricity.
You might need to explain that those windmills capture the movement of the air and then use this to energy to create electricity.
Before beginning the experiment students should complete the sections of their Investigation Report IR01 from ”Title to “Hypothesis”.
Making the windmills is quite simple but describing the process is difficult so some students may be a little overwhelmed by the instructions. I always scaffold the process quite a lot. With younger students in particular I will demonstrate building a windmill and then go through the process step by step with the class.
If possible take the class outside and see if they can get their windmills spinning in the wind. If it is not a windy day they can try running around holding the windmills.
At the end of the lesson gather the students together again and discuss their results.
What should happen in this experiment, and why?
Students should be able to describe how the windmill captures the wind and what the windmill does (spin). The windmills are quite directional – if they are not pointing in the right direction for the wind they will not spin or will only spin slowly.
Follow up questions:
• What did you discover about the best ways to get the windmill spinning?
• Do you live in an area that would be good for using windmills to generate electricity? Why or why not?
• What advantages do you think there might be in generating electricity this way (renewable, cost effective, clean etc). What disadvantages (not as efficient, can be noisy, dependent on the weather).
© www.monstersciences.com


